VNC
Ganeti Web Manager provides an in browser console using noVNC, an HTML5 client. noVNC requires WebSockets to function. Support for older browsers is provided through a flash applet that is used transparently in the absence of WebSockets.
VNC AuthProxy
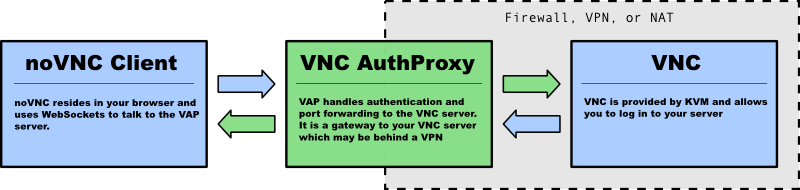
VNC AuthProxy is required for the console tab to function. VNC servers do not speak websockets and our proxy allows your ganeti cluster to sit behind a firewall, VPN, or NAT.

VNC AuthProxy has a control channel that is used to request port forwarding to a specific VNC machine. It will respond with a local port and temporary password that must be used within a short period. This allows a secure connection with the VNC AuthProxy, without compromising the vnc password, and without leaving the port open to anyone with a port scanner.
Configuring VNC AuthProxy
Set the host and port that the proxy uses in config.yml with the
VNC_PROXY setting.
Syntax is HOST:CONTROL_PORT, for example: "localhost:8888".
If the host is localhost then the proxy will only be accessible to clients and browsers on the same machine as the proxy. Production servers should use a public hostname or IP.
Note
If using Vagrant, you will need to add the VM’s FQDN and IP address
to your /etc/hosts file.
# located in your settings file
VNC_PROXY = 'localhost:8888'
To set up encryption, find where VNC AuthProxy’s working directory. This may depend
on how you have set it set up to automatically start; for instance, with runit,
it automatically sets the working directory to /etc/sv/vncauthproxy.
You then should put your HTTPS certificate file in /path/to/working/dir/keys/vncap.crt
and your HTTPS private key in /path/to/working/dir/keys/vncap.key. VNC AuthProxy should
then automatically accept encrypted connections.
Starting the Daemon
VNC AuthProxy is now controlled with an init.d script. To install the script, see VNC AuthProxy startup script.
Once installed, VNC AuthProxy can be controlled with standard service commands.
You can start, stop, and restart the service, and get check if the
service is running with status:
$ sudo service vncauthproxy status
If you do not wish to install VNC AuthProxy as a service, it can be manually started when inside the Ganeti Web Manager virtual environment.
$ twistd --pidfile=/tmp/proxy.pid -n vncap
Starting Flash Policy Server
Browsers that do not support WebSockets natively are supported through the use of a flash applet. Flash applets that make use of sockets must retrieve a policy file from the server they are connecting to. VNC AuthProxy includes a policy server. It must be run separately since it requires a root port. You may want to open port 843 in your firewall for production systems.
Start the policy server with twistd
sudo twistd --pidfile=/tmp/policy.pid -n flashpolicy
Firewall Rules
The following ports are used by default
8888: Control port used to request vnc forwarding. Should be open between Ganeti Web Manager and Proxy
12000+: Internal VNC Ports assigned by Ganeti. Should be open between Proxy and Ganeti Nodes.
7000-8000: External VNC Ports assigned by Proxy. Should be open between Proxy and Clients/Web Browsers.
843: Flash policy server. Required to support browsers without native websocket support. Should be open between Proxy and Clients/Web Browsers.
Debugging Help
Python Path for flash policy server
The following error indicates that your python path is not set or the proxy is not installed:
/usr/bin/twistd: Unknown command: flashpolicy
Ensure that your virtualenv is active:
source venv/bin/activate
If not using a virtualenv, then you must manually set the PYTHONPATH
environment variable as root:
export set PYTHONPATH=.